
I would like to show you a texturing and painting workflow I have recently done. I usually go through these steps with every area after I have finished shaping the basics of the landscape. I´ve choosen a (really) small remote island out of the endless ocean for my test object.
Texturing
Please note, that I use a very bright light settings to get a high contrast, tropical sunshine. Therefore I have to paint the whole area with a mid grey tone, to actually see the textures instead of a glearing white.
So, this is the basic position. A small risen dot in an empty area full of water. I choose my basic sand texture for the base layer and fill the whole area. So, nothing special here...

After that I start painting my base grass textures with 100%pressure. I always try to paint kind of clustered and connected shapes when it comes to grass textures. I will add palms and grass there next. And plants usually grow in "chaotic systems".But this is more crucial when it comes to larger terrains. For now, I just wobble the mouse to get some shape like this :)

Next, I add the second sand layer. This textures main function is to blend the grass with the base sand. I sourround the grass shape I have painted before. I don´t care for details at this point and paint it also with 100% pressure.
While doing this, I try to feather the borders of the grass shape to make it look more natural (chaotic) grown.Now I´m coming back to my base sand texture. With it, I feather the second sand layer, like I did before.
I usually use a 50% brush when this is done to blend the textures a little bit more on some edges. One must be careful with that, because you get a blurry look very fast when you overleap textures. I try to focus only on the edges of texture shapes. And to summarize this: I always texture from the top to bottom layer.Now I add some curly palms on the grass layer. I try to use not too many tree variations. Instead I differ the scaling a lot and how deep the trees trunks stuck in the ground to get some different heights. As for the grass textures, I usally try to form palm clusters with some space between them (well, this is a very small island, so it´s not that important here).
Scaling is one of the most crucial points (next to light) when it comes to level design in my opinion. So I add a NPC to see how heigh the trees actually are. And trees are quit big commonly (unless you are designing a tree nursery!).Adding the detail grass layer is next. Nothing special here I guess, because of the little space of this island. Like the textures, I always paint the big plants first and then move on to the smaller grasses. Doing this right it gives the plants a natural grown look (one can also hide those ugly edges on the gound where the grass is placed).
So here we go.. Quit green I think...
I´m quit pleased with these results of this fifteen minute work. But not happy :) ...Because this is only half the work.


Tainting
I have found out, using the color toos is very powerfull, when used focused. It is perfect to simulate light and shadows (especially in full and bright daylight), give whole areas a rich color variation and to blend textures much more naturally. You can just paint moss on stones, make small ponds deep and muddy or even simulate a giant shadow of a mountain that darkens the valley beaneth it. For this island, I wanted to try something new and paint a tropic ocean.
I have found out, using the color toos is very powerfull, when used focused. It is perfect to simulate light and shadows (especially in full and bright daylight), give whole areas a rich color variation and to blend textures much more naturally. You can just paint moss on stones, make small ponds deep and muddy or even simulate a giant shadow of a mountain that darkens the valley beaneth it. For this island, I wanted to try something new and paint a tropic ocean.
Let´s start with the shoreline. This is a shot of the unpainted area. No, this is not true. Like I have mentioned earlier, I have of a mid grey tone painted overall the area. So I have darkened my textures this way. This is to be a huge advantage now.

The thing I do, is to paint the sand wet with a slightly darker grey tone (since I like my natural sandcolor). I try to imagine the waves, flushing on the sandy shore and paint these small areas even a little bit darker.
Now I want to make the sand much brighter, hit by direct sunlight with no clouds before it. So I paint on it with a lighter color. This way, it is even possible to simulate cloud shadows or snowy mountains, just hit by the sunlight on their tops (like this).
I also tone the grass texture a little bit darker and with more saturation.
Now comes the fun part. Defining the actual water color for the shoreline. I want an emerald tone for it, so I surf google image search for references (I just love it!). I should mention, that I have the water shown and the fog turned on most of the times, because I want to see the final results and match the right colors. So, I paint one water color and try to match the one from a reference photos from google I like. The colour I have choosen will be the basetone of the following.Next is the ocean. The first thing I do is to raise the terrain just below the sea level. This is much easier painting in the first place and it fits perfect for this small island with shallow waters. Another point here is, it is easy to nearly even the ground and the water level at the horizons. This is a good way to fake an "endless ocean".
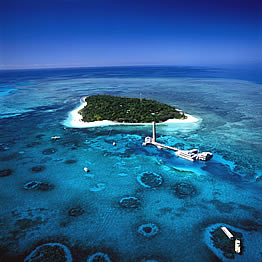
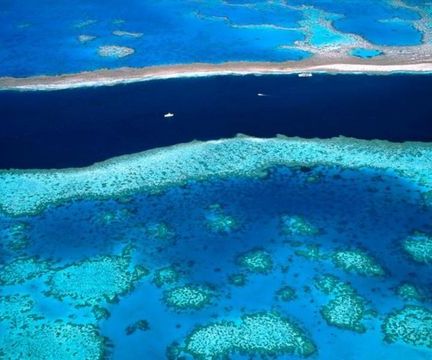
I choose myself four main colors of the previously selected color and paint them gradient away from the island. This way you can give the ocean different heights. I use the lightes tone to simulate heigher grounds like sand banks and darker colors for lower grounds or an abyss for example. This can take a lot of time testing, but the good thing about tainting is, that you can easily replace the colors for larger areas. Okay so far, but I have decided to use these colors for another area and go on to make it a little more rockily and paint kind of a riff instead of sand.Surfing google again, I have found some perfect pictures of tropical reefs (like here and especially here). While looking at (a lot) of them, I try to figure out the main shapes and colors of it and adopt them into the toolset. In this case, I have painted some sandbanks and "dotted" darker colors of the same tone around them. And again, I paint from top to bottom and tryied to get some clustered reefs. This is a lot of chaotic painting, but also a great fun ! It is not easy to explain in the end, but this picture shows more than words I guess !
The last thing I do, is paint the acutal reef. They are mostly clustered in round shapes with sand in it. Like chains, I have connected these single features with smaller reefs. I use a dark stone texture for this I also plan to use on cliffs later in that area. I have splitted the screenshot to point that out a little bit better.
You don´t have to be accurate in this whole process. This is just about messing around with... water colors :)
Well, thats´s pretty much it. So, turn the light on in your areas and start to paint and taint the hell out of them !
Looks like there is some more work for me to do. This was just that small island on the right over there... Man, I need holidays !


